How to prevent rotator cuff injuries through corrective exercise programming (Part 1)
David Cruz, DC, CSCS, FMS, SFMA
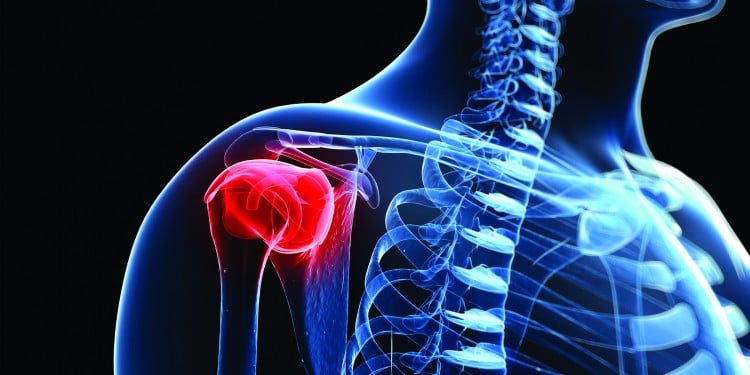
Shoulder pain and shoulder injuries are among the most common conditions within the general population and among athletes. Approximately 75 to 80% of these are caused by conditions related to the rotator cuff (1). The rotator cuff consists of four muscles, including the supraspinatus, infraspinatus, subscapularis and teres minor. These act to provide dynamic stability and control the position of the humeral head relative to the glenoid fossa during motions ranging from throwing to performing a push-up (2). There are many factors that can lead to shoulder pain and dysfunction, one being a muscular imbalance between the rotator cuff muscles and its relationship to the scapula and clavicle.
This two part series will describe the function of the rotator cuff and its synergistic relationship to the scapula and clavicle, while also providing exercises to strengthen the muscles of the shoulder complex. Correcting dysfunctional movement patterns of the shoulder complex typically requires a multifaceted approach including inhibiting, lengthening, and activating muscles whether the goal is preventative or rehabilitative. This part of the series will focus on corrective exercise strategies that inhibit and lengthen muscles by self-myofascial release in combination with static stretching. Part 2 of the series will provide you with corrective exercise protocols to stabilize and strengthen the rotator cuff muscles.
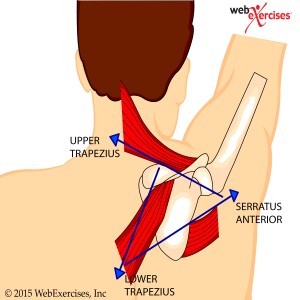
To understand how to implement corrective strategies we must first look at the anatomy and kinematics of the shoulder. The shoulder complex can be broken down into three distinct regions, the upper arm or humerus, scapula, and clavicle, which are working together providing movement in all three planes. These three regions create a mechanical linkage that is dependent upon one another for proper shoulder motion that is controlled by the upper trapezius, lower trapezius and serratus anterior.
Dysfunctional movement patterns are in part based on the concept of relative flexibility that suggests movement occurs through the pathway of least effort. For example, if hip movement is relatively stiff compared to that of the low back, then the movement is more likely to happen in the back (3). In the case of the shoulder, if the trapezius muscles are limiting proper scapula thoracic motion, the rotator cuff muscles will then compensate for this and become the “pathway of least effort” leading to compensation patterns. Therefore, inhibited or tight trapezius and serratus muscles will alter proper scapula motion. This results in improper clavicle movement due to these muscular imbalances ultimately affecting the rotator cuff.
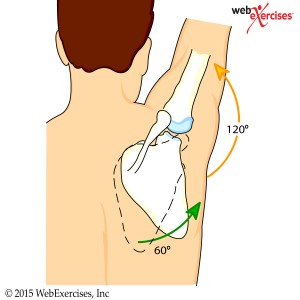
In order to have properly working rotator cuff muscles, proper scapula thoracic motion must be established in order to maintain the correct length-tension ratio of the rotator cuff muscles. The motion of the scapula and upper arm is defined as a 2:1 movement ratio, meaning for every 2 degrees of upward humeral motion there is 1 degree of upward scapular motion. Muscles involved in creating this movement are the upper and lower trapezius and the serratus anterior. A change in scapula position or motion may cause an internal rotation of the humerus resulting in a shortened internal rotator muscle (subscapularis) and a stretched or weakened external rotator muscle (teres minor). Any dysfunction of these muscles will require opposing muscles acting on the shoulder complex to be affected due to their relationship with one another.
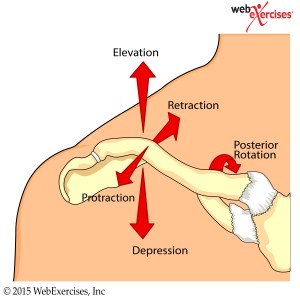
Proper shoulder motion and rotator cuff function are also dependent on clavicle movements that include protraction, retraction, elevation, depression and posterior rotation. As the scapula rotates upward the clavicle elevates up to 30 degrees at the acromioclavicular (AC) joint (4). Then as the arm elevates further the clavicle begins to rotate posteriorly along its axis allowing the scapula to further elevate upward.
This posterior clavicle rotation has been described in numerous studies including one by Ludewig and colleagues who performed a three dimensional analysis (5). Their findings indicate that as the arm elevates, 8 degrees of posterior rotation occurs when the arm is elevated to 110 degrees. Any loss of normal scapula motion will alter the clavicle motion and ultimately restrict the range of motion of the upper extremity. Therefore, prior to initiating any specific rotator cuff exercises it is imperative to restore the muscular function of the scapulothoracic, AC, and sternoclavicular (SC) joint regions.
In order to inhibit and lengthen these muscles a self-myofascial release (SMR) approach with either a foam roll or a tennis ball can be utilized. SMR using a foam roll has been shown to be effective for increasing flexibility when combined with static stretching. Mohr and colleagues demonstrated this when they compared foam rolling and static stretching of the hamstring muscles (6). Their study findings indicate using the foam roll for SMR in addition to static stretching is superior to either SMR or static stretching alone. Therefore, in order to maximize range of motion it is recommended to foam roll prior to static stretching.
The following protocol is based on the above-described findings and can be performed daily or at least 3 times per week. The SMR exercises are performed on the floor applying as much body weight pressure as can be comfortably tolerated for up to 1 minute at time.
- Trapezius and Rhomboid SMR
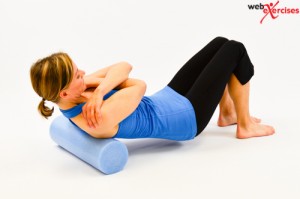
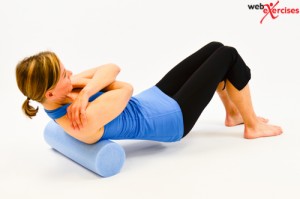
Begin seated on floor. Lie back placing foam roll across upper back. Cross arms in front, placing hands on shoulders. Lift hips off floor. Slowly massage upper back, rolling up and down as tolerated, for duration of 1 to 2 minutes. Maintain consistent pressure with foam roll. If a painful area is found, stop rolling and REST on the area for 30 seconds as tolerated, then continue.
- Posterior Shoulder Tennis Ball SMR
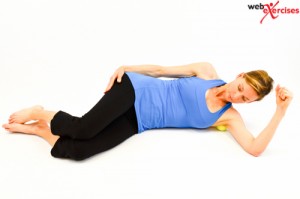
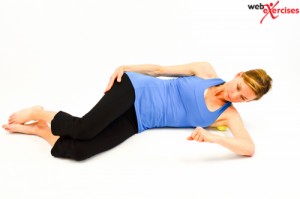
Begin lying on floor facing up. Place a tennis ball behind shoulder. Raise arm so elbow is at shoulder level and bent to 90°. Lift opposite shoulder slightly so that pressure is felt against tennis ball. Grasp wrist with opposite hand and move arm upward and downward massaging shoulder muscles. Perform massage for 1 to 2 minutes. Maintain consistent pressure with tennis ball. If a painful area is found, stop rolling and REST on the area for 30 seconds as tolerated, then continue.
- Pectoralis Major and Minor SMR with Tennis Ball
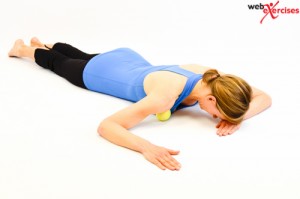
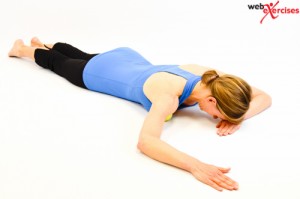
Begin lying face down with a yoga or tennis ball situated between the floor and below the clavicle with forearm flat on the ground. Applying constant pressure on the ball, slowly move forearm upwards, pause momentarily, and then slowly return to starting position.
Static stretching to compliment the SMR exercises can be performed daily or at least 3 times per week. It is recommended that each stretch is held for 30-60 seconds and repeated three times resting 30 seconds in between stretches. When stretching the posterior shoulder a cross body stretch is recommended as this was found to be more effective than the side lying sleeper stretch by McClure and colleagues (7).
- Cross Body Stretch
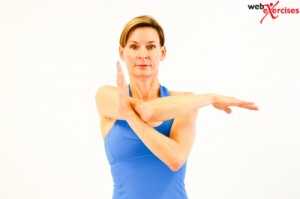
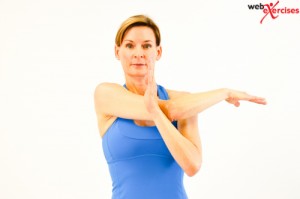
Begin seated or standing (ideally this is best done with the back against a wall to help stabilize the scapula and emphasize the stretch on the posterior shoulder). Extend one arm in front, and across body, at shoulder level. With opposite arm grasp arm above elbow and gently pull towards chest until a stretch is felt in the back of the shoulder. Hold for 20-30 seconds and repeat on opposite side.
- Static Foam Roll Chest Stretch
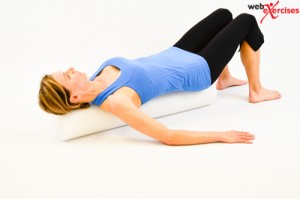
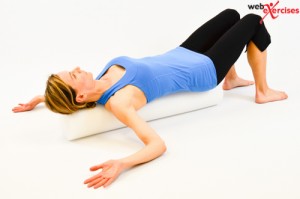
Begin by positioning yourself lying on foam roll with feet flat on floor. Foam roll should support the head and run along the spine down to pelvis. Place arms to sides. Bend both elbows to 90º at shoulder level with palm facing up. Relax as chest and shoulders stretch for 30-60 seconds. Do not try to force arms to floor.
All of the above displayed exercises are easy to execute and include minimal risks if performed as described. To achieve satisfying results it is important do them on a regular basis and for a minimum of 4 weeks.
References
(1) Clark, M.A., Lucett, S.C. (2014). NASM Essentials of Corrective Exercise Training. Burlington, MA. Jones & Bartlett Learning.
(2) Arnheim, D.D., Prentice, W.E. (2000). Principles of Athletic Training. Boston, MA. McGraw Hill.
(3) Lehtola et al. BMC Musculoskeletal Disorders 2012.
(4) Kisner, C., Colby, L.A. (2002). Therapeutic Exercise Foundations and Techniques. Philadelphia, PA. F.A. David Company.
(5) Ludewig, P., et al. (2004). Three-Dimensional Clavicular Motion Durning Arm Elevation: Reliability and Descriptive Data. Journal of Orthopaedic & Sports Physical Therapy, 34(3), 141-150.
(6) Mohr, A., et al. (2014) Effect of foam rolling and static stretching on passive hip-flexion range of motion. Journal of Sport Rehabilitation.
(7) McClure P, et al. (2007). A randomized controlled comparison of stretching procedures for posterior shoulder tightness. Journal of Orthopaedic & Sports Physical Therapy 37:108-14.

